Saturday, January 31, 2009

Visit the Patient Party!

Since my husband is laid-up and not very mobile since his ankle surgery, I decided to have a bunch of friends and family over for dinner. Tonight is the night and I've got a great menu planned (well, in my humble opinion at least.)
I've incorporated a lot of recipes I've come across on blogs, as well as some from my favorite books. Here's the final menu:

Appetizers
Bacon-Wrapped Dates Stuffed with Gorgonzola Cheese
Spinach Mozzarella Palmiers (adapted from a combo of Ina Garten's savory palmiers and Michele of My Italian Grandmother's Spinach Pinwheels .)
Bruschetta (store-bought) with Crostini
Assorted Olives
Crudite with Blue Cheese Dressing (store-bought)

Dinner
Pear & Feta Salad with Candied Walnuts and Sliced Red Pepper
Lemon-Spiced Chicken
Seafood Lasagna (adapted from a recipe on Melissa's blog Delicious Melicious .)
Roasted Brussel Sprouts with Pancetta and Garlic

Dessert
Limoncello Bars
Mini-Orange Chocolate Cakes (recipe from Ina Garten)
Chocolate Chip Cookies

I can't wait to update this week with photos and recipes! Here's hoping everything comes out delicious. Have a great weekend.

Thursday, January 29, 2009

Turkey Artichoke Manicotti

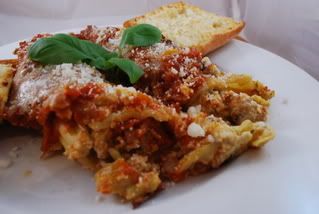
I know I saw a version of this on a few blogs here and there. It sounded so good, so this weekend, since we were pretty much stuck at home cause of my husband's ankle surgery, I spent Saturday making homemade marinara and manicotti. No I didn't make the manicotti crepes myself. That was a little too involved, but I did make the filling from scratch of course and let my homemade sauce simmer on the stove for 3 hours.
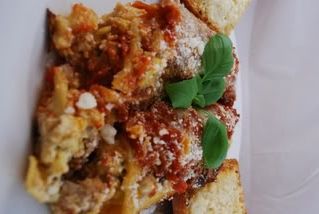
The end result was delicious!
Photobucket
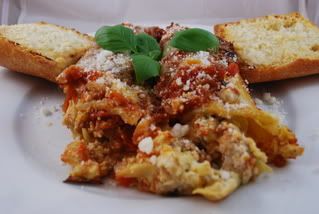
And it made plenty to feed my laid-up hubby lunch for a few days this week. So here's my version of this dish. Enjoy!

Turkey Artichoke Manicotti
Photobucket
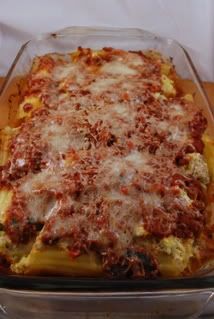
1/2 package of ground turkey breast (I prefer the darker meat, stays moister)
1/2 onion
2 cloves of garlic, chopped
1/2 teaspoon crushed red pepper flakes
1 tablespoon olive oil
1 1/2 cups ricotta cheese
1 cup shredded mozzerella cheese
1/2 cup grated romano cheese
1 12-oz can artichoke hearts, chopped
sprinkle of oregano
small handful of chopped fresh basil leaves
1 egg, beaten
salt and pepper
8 manicotti shells, cooked according to package directions, drained and cooled
4 cups homemade marinara sauce (recipe below)

Preheat oven to 375 degrees.
In a skillet, brown your turkey meat along with the garlic, onions, red pepper flakes and olive oil. Once browned, remove and set aside to cool. In a bowl combine the ricotta cheese, 1/2 cup of the mozzarella, romano and chopped artichoke hearts. Mix in your oregano and basil as well. Season with salt and pepper. Add your cooled turkey and onion mixture, mix well. Stir in your beaten egg and mix till combined evenly.
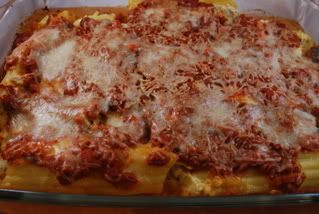
Prepare a large baking dish by covering the bottom with 2 cups of your sauce. Fill your manicotti pasta tubes with about 3 to 4 tablespoons of mixture, whatever you can squeeze in really. Lay them down in the pan on top of the sauce. If you have leftover mixture (which I did), just drop it in spoonfuls over top of your filled manicotti shells. It'll get eaten somehow in the whole mix!
Next top the filled shells with the rest of your marinara sauce. Then sprinkle generously with the remaining shredded mozzarella - you can go ahead and add more, I won't tell :)
Finally cover the dish with foil and place it in the oven. If you aren't ready to bake you can also freeze or refrigerate it at this point. Just make sure to completely thaw or bring it back to room temperature before you bake it. Anyway, where were we....oh right...so after about 30 minutes of baking it covered, remove the foil and allow it to bake for another 10-15 minutes to bake your cheese on top.
Photobucket
Remove, let cool a bit and enjoy with some crusty garlic bread.
Photobucket

Homemade Marinara Sauce
1 32-ounce can of whole peeled tomatoes, pureed in a food processor
4 tablespoons olive oil
1 red pepper, diced
1/2 onion, grated
4 cloves garlic, chopped
1/2 tablespoon anchovy paste
2 tablespoons tomato paste
1/2 teaspoon sea salt (I don't like to add a lot of sauce because I feel you get that from the romano cheese you sprinkle on at the end.)
1/2 cup dry red wine (I think I actually added a bit more, but you probably don't need more than that to get the flavor.)
1/2 cup beef stock
1 cup water (you can add less depending on how much sauce you need or how thick or thin you want it)
2 pinches of sugar (I didn't measure! I just pinched, tasted, pinched again, tasted and it was good. Sorry)
1 bay leave
a small handful of fresh chopped basil leaves

In a medium stockpot heat your olive oil. Throw in your finely chopped red pepper, your grated onion with the juices and your chopped garlic. Saute until the mixture is soft and tender. Next, add your anchovy paste, tomato paste and salt and mix in well. Once incorporated, add your red wine. Let it cook for about 3 minutes to incorporate the flavor. Next add your beef stock, water and tomatoes and bring the mixture up to a simmer over medium heat. Turn the heat down to low on your sauce, stir it well, add your bay leave, pinches of sugar and basil leaves and let it simmer on low for 2 to 3 hours to develop the richness of the sauce. Keep a lid cocked on the pot for the simmering time and make sure to stir the sauce often to keep it from burning and sticking to the bottom of the pan. Taste often too and adjust for seasonings. If you want a spicy sauce, you can add a teaspoon or more or less of crushed red pepper flakes to the onions and peppers while sauteing. Serve with your favorite pasta dish, like this turkey artichoke manicotti
Photobucket
and enjoy.

Tuesday, January 27, 2009

Man Quiche (or keesh, if you prefer)

Let's be frank. Quiche is not a manly word. Why? Well, for starters, it's French. I know it's a romance language and all but American men aren't good with French words. At least my husband isn't. Unless it's French fries, he's clueless. In fact, I doubt my husband even knows how to spell quiche. He probably thinks it starts with a K and ends with an S and an H - keesh anyone? On top of the fact that it doesn't sound manly - it doesn't look real manly either. Usually a quiche is small and cute, something that ladies eat at a brunch or at a woman's tea. It's a food for ladies who lunch - a dainty egg custard tart filled with asparagus, diced ham (maybe) and some cheese. Well I've transformed the quiche. Or, actually, my mother transformed it.
Photobucket
She created what I call a man-quiche to satisfy the appetites of my brother and father. If you want to serve quiche for dinner, then this is it. It's filled with sausage, eggs, cheese, spinach, stuffing and onions. In fact, you could almost call this a casserole. Call it what you will, but don't underestimate it's ability to fill up even the hungriest of men. This is one of my husband's favorites. Enjoy!

Man Quiche
source: my mom
Photobucket
1 pie crust, homemade or frozen like Pilsbury
5 links of turkey or chicken sausage, casings removed
1/2 onion, chopped
1 10 oz. package of frozen chopped spinach, thawed and drained
2 cups of shredded monterey jack cheese
1/4 cup grated parmesan cheese
1/2 cup stuffing mix (I use Pepperidge Farm)
2 cloves garlic, chopped
3 eggs
1/2 cup milk
1/2 cup half and half
1/4 teaspoon nutmeg
salt and pepper
Paprika and extra parmesan for top

Preheat oven to 350 degrees. Lay out your pie crust in a deep dish pie plate. Place in the oven for 10 minutes to prime the crust, this helps it stay crispy, not soggy, when you add the filling later. Remove from the oven, set aside and let cool.
Photobucket
Turn oven up to 400 degrees.
In a skillet, brown your sausage fillings along with your chopped onion. Remove from the skillet and let cool.
In a bowl, combined your cooked sausage and onion, drained spinach, shredded cheese, parmesan cheese, stuffing mix and garlic until mixed evenly.
Photobucket
Pour this mixture into your pie shell.
In a small bowl crack and beat your eggs, whisk in the milk and half and half and nutmeg. Season with salt and pepper and pour it over top of your sausage mixture in the pie shell. Sprinkle the top with paprika and grated parmesan.
Photobucket
Place in the oven and cook for about 35 minutes or until quiche is set in middle.
Slice and serve with a green salad.
Photobucket

Monday, January 26, 2009

Perfect Filet Mignons

Last Tuesday my husband had ankle surgery. He's not only flat-footed but, ever since he was about 5-years-old, he's thought he was Spiderman. He won't ever admit that, but that's my theory. He spent his youth jumping off bridges (I'm not talking like make-shift bridges, I'm talking public road bridges...yeah he's that breed of crazy!). He also could easily be found jumping out of really tall trees and even jumping out the window of his third-story bedroom. He was a child with no fear and it stretched into his adulthood.

About a year and a half ago at 36 years of age, he jumped off the top of one of the public buses he services as a mechanic as part of a practical joke. As luck would have it, the joke ended up being on him. He landed on a 5-inch thick power cord, twisted his ankle and chipped a bone in his joint. He whined and griped about the pain for about a year and then finally took my advice and went to the doctor. Surgery was the only remedy, so last week he went under the knife. Since then, he's been a permanent fixture on our couch, his ankle encased in a bulky cast. So as part of my marriage commitment to be a good wife in sickness and in health, I've spent the last few days making some of his favorite meals, the first of which are these Perfect Filet Mignons. I guess you could say the oxycodone and visteral are what's taking away my husband's residual surgery pain, but I say it's my fabulous home cooking. Hey, a girl can have her illusions.


Perfect Filet Mignons
source: Me and everyone else who has ever made a steak (honestly...come on! I'm not trying to claim trademark on a well-grilled steak but nor can I attribute it to one person.)
Photobucket
2 fillet mignons (I found that Trader Joe's has some of the best fillets available in a supermarket)
freshly ground black pepper
seal salt
olive oil
1 package of sliced mushrooms
2 tablespoons butter
a small half handful of chopped sage leaves
1/4 cup crumbled blue cheese or gorgonzola

Rinse and pat dry your fillets - the drier the better. Season each fillet with salt and pepper on each side. Place a grill pan, like my beloved Mario Batali flame red pan, over your burners. Turn the burners to medium heat and let the grill pan get HOOOOOOT! Brush it with plenty of olive oil. Once smokin', Throw in your fillets.
Cook for 3 to 5 minutes on each side depending on desired doneness.
Photobucket
Once done, remove from pan.
Photobucket
Top each fillet with half of the crumbled blue cheese.
Meanwhile, in a small skillet melt the two tablespoons of butter and add your sliced mushrooms and chopped sage leaves. Saute until the mushrooms are tender. Spoon over your fillets.
Photobucket
Serve and enjoy.
Photobucket
That's one beautiful steak! Makes a man forget his hurtin' ankle pain :)

Sunday, January 25, 2009

Barefoot Bloggers: Easy Sticky Buns

I made these on Sunday morning and was really looking forward to them. I saw Ina make them on Good Morning America and they looked so simple and delicious. Since I'm not too keen on baking, I loved that you could get an ooey, gooey, nutty sticky bun without going through the hassle of making dough. These were definitely true to their name "easy" sticky buns, however I did have some issues with Ina's oven temp and cooking time.
Photobucket
First of all, I halved this recipe because not only do I barely need sticky buns as they only "stick" to one thing - if you catch my drift - but I definitely don't need 12 of these sweet little monsters hanging around. I did everything Ina said and my end result was slightly overbaked buns. They were much crispier and much more burnt than I would have preferred - and I even took them out at 25 minutes!! So despite these issues, I would make them again because they are easy and the flavor is great. However, next time I will be cooking them either on 400 degrees for 15 minutes or 350 degrees for 20 minutes. If you want to make these, which I strongly suggest because they are mmmm mmmmm good, then take my advice and cut down on the cooking time or the oven temp or both. That way you'll come out with not only ooey, gooey buns, but soft supple ones as well. And who doesn't like a nice soft sink-your-teeth in bun :) Enjoy!!

Easy Sticky Buns
source: Ina Garten, The Barefoot Contessa
Photobucket
12 tablespoons (1 1/2 sticks) unsalted butter, at room temperature
1/3 cup light brown sugar, lightly packed
1/2 cup pecans, chopped in very large pieces
1 package (17.3 ounces/2 sheets) frozen puff pastry, defrosted for the filling
2 tablespoons unsalted butter, melted and cooled
2/3 cup light brown sugar, lightly packed
3 teaspoons ground cinnamon
1 cup raisins
Preheat the oven to 400 degrees. Place a 12-cup standard muffin tin on a sheet pan lined with parchment paper.
In the bowl of an electric mixer fitted with the paddle attachment, combine the 12 tablespoons butter and 1/3 cup brown sugar. Place 1 rounded tablespoon of the mixture in each of the 12 muffin cups. Distribute the pecans evenly among the 12 muffin cups on top of the butter and sugar mixture.
Lightly flour a wooden board or stone surface. Unfold one sheet of puff pastry with the folds going left to right. Brush the whole sheet with half of the melted butter. Leaving a 1-inch border on the puff pastry, sprinkle each sheet with 1/3 cup of the brown sugar, 1 1/2 teaspoons of the cinnamon, and 1/2 cup of the raisins. Starting with the end nearest you, roll the pastry up snugly like a jelly roll around the filling, finishing the roll with the seam side down.
Trim the ends of the roll about 1/2 inch and discard. Slice the roll in 6 equal pieces, each about 1 1/2 inches wide. Place each piece, spiral side up, in 6 of the muffin cups. Repeat with the second sheet of puff pastry to make 12 sticky buns.
Bake for 30 minutes, until the sticky buns are golden to dark brown on top and firm to the touch. Allow to cool for 5 minutes only, invert the buns onto the parchment paper (ease the filling and pecans out onto the buns with a spoon), and cool completely.

Thursday, January 22, 2009

Winter Minestrone

The latest version of Gourmet Magazine was all about Italian comfort foods. Flipping through it just made me yearn for all things carby, tomatoey and meaty. Mmmmmm. But, as the holidays would have it, my hips really don't need anything carby. While I love a big bowl of pasta as much as the next girl, I try to eat it sparingly. I also felt like my husband and I needed to get in our veggies and greens after not only a holiday of eating eating eating, but in January it is my dad's birthday and then Sunday football games. So...yeah, the junk food track extends into the first few weeks of January..at least.

With that in mind, I chose this hearty Winter Minestrone . I also submitted it to Joelen's Culinary Adventures Foodie Films: Big Night contest.
Photobucket
Packed with nutrient rich greens, escarole, cabbage and chard, it made for a vitamin-packed punch. On top of that, the pancetta, sauteed garlic and onions and parmesean rind add to the salty, smokey flavor of this soup.
Photobucket
(As a side note, isn't this bowl great? It has a place for your crackers or bread? It was a wedding gift from my friend Kiron. Love it!)

I was worried it would be bland since the stock consists solely of water and whatever juice comes from the tomatoes. In most soups you see chicken or beef or vegetable stock being used. No matter though - this soup was as tasty as could be. In fact, using stock would probably make it too salty or take away from the tomato flavor.
Photobucket

One word of caution
: this recipes makes A TON of soup. We're talking soup kitchen, feed-an-army size here. It was almost quite amazing how much soup it made! I just kept filling tupperware containers when we were done. I served it with a basil parmesan garlic bread. It was truly the perfect winter meal - and it even had a little bit of pasta in it to satisfy the need for some comforting carbs.

Monday, January 19, 2009

Breakfast Tart

I usually try to make breakfast on Sunday mornings. It is the one day that my husband and I wake up late, enjoy a slow morning and a big breakfast. Most of the time it's just bacon, eggs and toast, but sometimes I strive to try something a little different - homemade pancakes, french toast, eggs Benedict etc. Depending on how ambitious I'm feeling in the morning and how well I've shopped the day before. Earlier this week, while paging through my beloved Williams-Sonoma catalog, I came across this recipe. The picture was gorgeous - this quaint little rustic breakfast tart, with eggs, bacon, cheese and bread all presented in a neat little package.
Photobucket
So I bought all the necessary trappings on Saturday and went to work on this Sunday morning. I had a few snafus - mainly with the puff pastry. For one, the recipe says to roll it to a 1/2 inch thick. Well, I don't know about you but the frozen puff pastry I've always used is already about 1/4 inch thick so there goes that step. Secondly the directions wanted me to make some sort of edge with the puff pastry dough but I really couldn't see how that was going to work because it was already smaller than the size the recipe wanted me to cut it to. So instead, I brought out my tart pan and laid the puff pastry in it and cut and pressed to fit it's round shape. This worked out fine.
Photobucket
I also used fontina instead of gruyere because I had some on hand. And I used more cheese than what the recipe calls for. I also substituted fresh chopped parsley for the chives because, again, I already had parsley on hand. Waste not, want not! Overall, this was a very tasty little breakfast - and convenient too! Since mine was round it looked more like a breakfast pizza than a tart and who doesn't love pizza for breakfast! Enjoy!

Breakfast Tart
Williams-Sonoma catalog
Photobucket
1 sheet puff pastry dough
1 egg, lightly beaten with 1 tsp. water
3 oz. crème fraîche (I used sour cream because I had it on hand, worked fine.)
2 oz. shredded Gruyère cheese
Salt and freshly ground pepper, to taste
8 bacon slices, cooked until crisp
3 eggs
10 fresh chives, cut on the bias into 1/2-inch lengths

Directions:
Thaw the puff pastry dough according to the package instructions.

Preheat an oven to 425°F. Lightly grease a baking sheet.

On lightly floured surface, roll out the puff pastry to 1/4-inch thickness and cut into a 10-by-8-inch rectangle. Place the pastry on the prepared baking sheet. Using a paring knife, score a border 1/2 inch in from the edge of the pastry. Using a fork, prick the center of the pastry. Brush the border with the egg wash and refrigerate for 15 minutes.

In a small bowl, stir together the crème fraîche and cheese, and season with salt and pepper.

Spread the crème fraîche mixture on the pastry, keeping the border clean. Lay the bacon on top, slightly overlapping the slices. Bake the tart for 14 minutes, rotating the baking sheet halfway through baking.

Remove the baking sheet from the oven and place it on a level heatproof surface. Using a fork, prick any large air pockets in the pastry. Crack the eggs onto the tart, spacing them 2 inches apart. Bake until the egg whites are set and the yolks are still soft, 7 to 10 minutes.

Transfer the tart to a platter, garnish with the chives and serve immediately. Serves 4.

Photobucket

Wednesday, January 14, 2009

Beer Label Design

A friend of mine asked me to help her design a beer logo and label for her husband, who brews a variety of homemade beers in their house. I was more than happy to take on this project! I have a grad degree in design but haven't been able to use it much professionally quite yet. So meanwhile, I'm very excited to enhance my portfolio with jobs for friends and family. Here is what I came up with! I think Mary and John are very happy with the design. In fact, she is off to Kinkos as we speak to get it printed up and pasted on their bottles. Maybe I'll get a six-pack out of the deal :)
Photobucket

Tuesday, January 13, 2009

Salmon Pesto Pasta

The inspiration for this dish was found at The Way The Cookie Crumbles. Bridget makes some really delicious looking food - and takes beautiful pictures of it as well. When I saw her post for salmon pesto pasta I was salivating! The combination just sounded so delicious - I had never thought of putting salmon in my pesto pasta! I perfected a pesto technique when my husband and I were "living in sin" about 4 years ago and working extremely low paying jobs. Pesto pasta was not only easy and fresh, but cheap - especially in the summer when I could buy a bouquet of fragrant green basil at the farmers market for $1.50.

So here's my version of Bridget's ingenious idea for Salmon Pesto Pasta. These measurements are rough - I truly go by color, texture and taste when making pesto. So go by these measurements, but feel free to adjust to your taste. Enjoy!

Salmon Pesto Pasta
Photobucket
6 oz. smoked salmon, chopped
1 lb orecchiette pasta (1 box)

6 cloves of garlic, peeled
1 teaspoon olive oil
salt and pepper to taste
1 cup of packed fresh basil leaves
1/2 cup of fresh Italian flat-leaf parsley
1/4 cup pine nuts
1/3 cup grated pecorino romano, plus more for sprinkling over finished pasta
juice of half a lemon
olive oil, atleast 1/2 cup
1 tablespoon half and half, room temperature

Preheat oven to 400 degrees. Take a slightly large piece of foil, place your peeled garlic cloves in the center of the piece of foil, pour your teaspoon of olive oil over the cloves, season with salt and pepper and then fold up the foil to form a little packet. Place the packet in your oven and roast the garlic for about 30 to 35 minutes. You'll smell it when it's done. Remove from the oven and let cool.

Meanwhile, place your pine nuts in a small saute pan and toast over medium low heat. Keep an eye on them because they will burn easily. Once toasted - slightly browned - remove from the heat and set aside to cool.

Set a small pot of water to boil. Once it's boiling add your basil leaves and blanch for 1 minute. Immediately remove and plunge the basil leaves in ice cold water. This helps the basil keeps it's bright green color.

Next, in the bowl of your food processor, combine the roasted garlic cloves, basil and parsley, pine nuts, romano cheese, and lemon juice. Turn on the processor and process. While it's processing, slowly stream in olive oil through the opening at the top of the bowl. Once your pesto has a thick but saucy consistency you're done. Season it with salt and freshly ground pepper and spoon into a large serving bowl, big enough to toss your pasta in.

Set a large pot of water to boil. Once boiling, pour in your orecchiette and cook according to package directions. Drain and place in your serving bowl atop the pesto. Toss your pasta until it's well coated and then fold in the chopped smoked salmon. Sprinkle with some grated romano cheese and freshly ground black pepper and serve.
Photobucket

Monday, January 12, 2009

BB: Banana Sour Cream Pancakes (And, more importantly, my 100th post!)

WOW!!! I can't believe I've finally hit 100 posts. I've only been blogging for a few short months now and I have already learned so much about my own cooking skills and expanded my culinary knowledge 10-fold. It's been a much more rewarding experience in so many ways than I could have ever realized. I do get made fun of mercilessly by various people for being a "blogger", but no matter. I keep on plugging away! Sticks and stones may break my Pyrex baking dishes, but names will never stop me! No, I know they are just teasing me and probably think I'm a colossal dork, but I just truly love cooking and sharing my experiences in the kitchen. It brings me joy.

And so do pancakes, which brings me to last week's Barefoot Bloggers recipe, Banana Sour Cream Pancakes. Now I've made homemade pancakes before and I have to say these weren't my favorite. I love the banana flavor - and I even added chopped pecans to my batter, but I found the batter very runny and the pancakes extremely dense. I don't know if my baking powder has lost it's vim and verve, or it's just the recipe. I even lightened it up by using skim milk and light sour cream. Still I found these to be quite dense in texture. I like my pancakes light and fluffy (I'm truly a Bisquick girl at heart) and these didn't really deliver. The flavor was spot on though. But I think that had more to do with my perfectly ripe bananas. Either way, here are my results. I don't think I'll be making these again however.

Banana Sour Cream Pancakes
source: Ina Garten, Barefoot Contessa, www.foodnetwork.com
Photobucket
1 1/2 cups flour
3 tablespoons sugar
2 teaspoons baking powder
1 1/2 teaspoons kosher salt
1/2 cup sour cream
3/4 cup plus 1 tablespoon milk
2 extra-large eggs
1 teaspoon pure vanilla extract
1 teaspoon grated lemon zest
Unsalted butter
2 ripe bananas, diced, plus extra for serving
Pure maple syrup


Sift together the flour, sugar, baking powder, and salt. In a separate bowl, whisk together the sour cream, milk, eggs, vanilla, and lemon zest. Add the wet ingredients to the dry ones, mixing only until combined.
Melt 1 tablespoon of butter in a large skillet over medium-low heat until it bubbles. Ladle the pancake batter into the pan to make 3 or 4 pancakes. Distribute a rounded tablespoon of bananas on each pancake. Cook for 2 to 3 minutes, until bubbles appear on top and the underside is nicely browned. Flip the pancakes and then cook for another minute until browned. Wipe out the pan with a paper towel, add more butter to the pan, and continue cooking pancakes until all the batter is used. Serve with sliced bananas, butter and maple syrup.
Photobucket

Thursday, January 8, 2009

Chicken Divan Pizza

Yes - that's right, pizza. See...
Photobucket
I'm always wary of saying I came up with this recipe on my own since it seems everything is just a variation of something else. I mean I obviously didn't come up with the Chicken Divan part on my own - I've been eating Chicken Divan ever since my baby brother was born. In fact, I remember the very first time I ever had Chicken Divan. My mother had just given birth to my baby brother via c-section and had to stay over at the hospital for an extra couple of days. Therefore, my father and I were on our own at home, which was probably pretty stressful for my dad since my mom was a homemaker and he worked all the time. He wasn't used to taking care of the daily minutia of a five-year-old ie me, so even small tasks like brushing my hair were difficult. And it didn't help that I was quick to tell him that almost everything he did, including brushing my hair, was done wrong. To me if it wasn't done "mom's way" it was the wrong way. When it came to cooking, the only thing he really knew how to make was pasta and eggs, which seems to be every man's mantra in the kitchen.
Fortunately for us, our very generous neighbors came over armed with numerous casseroles to get my dad and I through those couple of days - and to help my mom out for the first week when she got home with my baby brother. One of those such casseroles was Chicken Divan. It was, in my opinion, the best of the lot. I thought the hamburger casserole was going to be my favorite, but chicken divan easily trumped it. My dad enjoyed it as well so my mom quickly learned how to make it and it became part of her monthly rotation of weeknight classics.
It's a simple dish - baked chicken and broccoli smothered with a creamy curry-scented mushroom sauce. The traditional version uses mayonnaise, cream of mushroom soup, curry powder, lemon juice and cheddar cheese. It's not low-cal by any means, but it sure is tasty.
So while I was trying to decide what to make for dinner the other night, I realized I had all the trappings for the perfect chicken divan. Except for the mushroom soup. Then I thought - what if I put chicken divan on top of a pizza and smothered it with tons of shredded cheddar?? Let me tell you, it was one of the best "lightbulb moments" I've ever had. I lightened up the sauce and went to town. This was literally one of the best specialty pizzas I've ever had.
Photobucket
Not to mention, that it brought me back to my childhood and that particular moment when I was introduced to my baby brother and chicken divan. Enjoy!

Chicken Divan Pizza
source: various Chicken Divan sauce recipes and me
Photobucket
1 Boboli thin crust pizza shell
1 large chicken breast
2 cups of broccoli florets
3 cloves garlic, minced
3 tablespoons olive oil
salt and pepper to taste
1 1/2 cups of shredded cheddar cheese

For the Divan sauce:
3 tablespoons flour
3 tablespoons butter
1 cup of skim milk
1 teaspoon curry powder
1 teaspoon dijon mustard
juice of half a lemon
salt and pepper to taste

Preheat the oven to 350 degrees. Place your chicken breast on a baking sheet, coat with 1 tablespoon of your olive oil, season with salt and pepper and then sprinkle 1 clove of minced garlic down on top of the chicken.
In a separate baking dish, place your broccoli florets. Toss with the remaining olive oil and the other 2 cloves of minced garlic. Season with salt and pepper and place in the oven with your chicken.
Allow the chicken and broccoli to cook for about 35 to 40 minutes until the chicken is cooked through, but not dry.
Remove from the oven and let cool. Once cool, you can slice or shred up your chicken into bite size pieces.
Meanwhile in a small saucepan, melt your butter and then whisk in your flour to form a roux. Allow the butter and flour to cook for about 1 minutes, with constant whisking, over medium low heat. Whisk in your skim milk. Once the mixture begins to thicken, whisk in your curry powder, mustard and lemon juice. Once combined, season with salt and pepper to taste (don't make it too salty because you will get a lot of salt from the cheese and then any Parmesan you top your pizza with). When you have a thick sauce, remove from the heat.
Time to arrange your pizza!
Place your pizza shell on a pizza pan. Pour down the divan sauce to cover the shell, put as little or as much as you want. I like a saucy pizza so I laid it on pretty thick. Next top the sauce with your chicken and broccoli. Finally sprinkle down your shredded cheddar cheese and throw that baby into your still hot 350 degree oven. I like to cook it at 350 for 10 minutes and then bump up the heat to 425 for the last 5to 10 minutes to get a crispness on the cheese and crust. That's just my personal preference though. If you like a softer pizza then cook it on 350 for 15 minutes. Remove, slice and enjoy with crushed red peppers and Parmesan cheese.
Photobucket

Tuesday, January 6, 2009

Scallops Dijon...a flop?

I don't know if these were a complete flop - I mean it's not like I overcooked them or anything tasted horrible. But they weren't a complete success. I followed this recipe pretty much verbatim except that instead of serving the scallops on a bed of linguine I served them on a bed of sauteed baby spinach. In addition to the fresh parsley, I added in fresh thyme. I also added a piece of crispy prosciutto to the top of the dish for both flavor and presence. I do have to say, this dish looks beautiful.
Photobucket
It's colorful, presents well and is full of fresh ingredients. The flavor however, was on the bland side. I don't really understand why. Perhaps I didn't let the wine reduce enough to concentrate it's flavor? Maybe it just needed more salt? Also, the dijon flavor was a bit overpowering, which is rare for me to say since I absolutely love dijon. So needless to say, I won't be trying this one again. But I had to post because the presentation turned out so pretty. And maybe you have a suggestion for how to improve this recipe? Any thoughts?

Bay Scallops Dijon
source: Whole Foods Market Cookbook
Photobucket
3/4 pound dried linguine
Salt to taste
1 tablespoon extra virgin olive oil
1 medium red bell pepper, julienned
1/2 cup chopped red onion
1 clove garlic, finely chopped
3/4 pound bay scallops (I used regular sea scallops and counted about 4 per person)
2/3 cup white wine
1/2 tablespoon Dijon mustard, more to taste
1/4 cup chopped flat-leaf parsley
Pepper to taste

Cook linguine in boiling salted water until al dente, according to package instructions. Drain thoroughly.

Meanwhile, heat olive oil in a skillet over medium high heat. Add peppers, onions and garlic. Cook until vegetables are tender, about 5 minutes, stirring often. Add scallops and cook 1 minute longer. Add wine and simmer for 2 minutes, until scallops are just cooked through. Stir in mustard and parsley. Taste and adjust seasoning with salt and pepper. Serve over linguine.

Monday, January 5, 2009

Farewell Holidays! (And Eggnog Cheesecake)

Well, Christmas 2008 is over. It was a whirlwind holiday that seemed to pass quicker than any in previous years. Why? I really don't know. Probably because I'm getting older and starting to say things like, "Where has the time gone? I remember just yesterday..." Over the holiday, I saw children I used to babysit for and pulled out that old line I never thought I'd use, "I remember when you were this big!". I know they don't care and they just roll their eyes, but I still can't help but let these words escape my lips! Oh well.
So to say farewell to the holiday season yet again, here is one last holiday recipe along with a few pictures of our poor tortured cats who we dressed in a santa suit.
Photobucket
This is Sawyer, our ham. He's such a good model!
Photobucket
This is Darby, who doesn't ever sit still, so I had to hold him for a photo.
Photobucket
This is Mia. She is sneaking toward the tree to put out presents :)

And for your culinary pleasure, an Eggnog Cheesecake with a Gingersnap Cookie Crust . I baked this for the final holiday get together of the season for me, which was on Saturday. My aunt had a dinner party with about 20 guests. This cheesecake was a hit. Someone even asked me if I baked it in a water bath because it was so light and fluffy. I didn't.
I found the recipe online and it was perfect. So stockpile this one away for Christmas 2009. It'll be here before you know it because, as I seem to always be saying nowadays, time really flies!

Also, excuse the poor photos. I had to snap them quickly before my aunt laid the cake on the table. Then I had to snap a quick one of the last piece before it was gone!

Eggnog Cheesecake with Gingersnap Crust
source: Southern Living, October 2007
Photobucket
12 ounces gingersnaps (about 48 cookies), finely ground
1/4 cup sugar
1/4 cup melted butter
32 ounces 1/3-less-fat cream cheese (I used FULL FAT cream cheese because I wouldn't bake a cheesecake with anything less. It's a cheesecake, not diet food!)
4 large eggs
2 cups refrigerated or canned eggnog, divided
2 cups powdered sugar
2 tablespoons all-purpose flour
1 cup whipping cream
Garnish: freshly grated nutmeg
Preparation

Stir together first 3 ingredients; press mixture onto bottom of a 10-inch springform pan.

Beat cream cheese at medium speed with an electric mixer until smooth; add eggs, 1 at a time, beating until blended after each addition. Add 1 1/2 cups eggnog, and beat until blended. Fold in 2 cups powdered sugar and 2 Tbsp. flour; carefully pour cream cheese mixture into prepared pan.

Bake at 325° for 1 hour. Turn off oven. Let cheesecake stand in oven, with door closed, 1 hour. Remove to wire rack, and let cool completely. Cover and chill at least 8 hours.

Beat whipping cream at high speed with an electric mixer until stiff peaks form; fold in remaining 1/2 cup eggnog. Spread mixture evenly over top of chilled cheesecake, and garnish, if desired.
Photobucket

Friday, January 2, 2009

BB: Pappa Al Pomodoro

I know, I know - I'm quite late with my Barefoot Bloggers entry for this month. I was so on the ball with my first one and then the holidays hit and time went out the window. But I finally got a chance to make this soup last night for a comforting New Year's Day dinner and it was a hit! I served it with Grilled Salmon BLT Wraps . I'm so glad I made it because originally I wasn't very excited about this recipe. It just sounded weird to me for some reason (bread in soup? won't that be soggy and gross? and is this tomato sauce or soup?). Despite my confusion, it is soup - and a very good one at that. The tomato and fresh basil is a combo that just can't be beat and my whole family loved the crunchy, salty topping for the soup. I did make a few changes.
1. I left out the fennel because no one in my family likes it, except my mom.
2. I only used one onion and found it to be plenty sufficient. Two would have been too much, well in my opinion.
3. I browned the diced pancetta in a small skillet on the stove first before throwing it in the oven. I hate eating chewy half-cooked pancetta so to ensure I got a crispy product I browned it up first, then tossed it with basil and bread and baked it.

I also have to say - I had to go to three grocery stores yesterday to find fresh basil! It was quite frustrating because there really is no substitute for fresh basil so I felt like I was on some kind of culinary mission. Anyway, this soup is definitely a keeper and will become a staple in my house! And as a bonus it just smells absolutely awesome while simmering away on the stove. Don't second guess this soup like I did - just make it. You will be glad you did! Enjoy!

Pappa Al Pomodoro
Ina Garten, Barefoot Contessa
Photobucket
1/2 cup good olive oil
2 cups chopped yellow onion (2 onions)
1 cup medium-diced carrots, unpeeled (3 carrots)
1 fennel bulb, trimmed, cored, and medium-diced (1 1/2 cups)
4 teaspoons minced garlic (4 cloves)
3 cups (1-inch) diced ciabatta cubes, crusts removed
2 (28-ounce) cans good Italian plum tomatoes
4 cups chicken stock, preferably homemade
1/2 cup dry red wine
1 cup chopped fresh basil leaves
Kosher salt and freshly ground black pepper
1/2 cup freshly grated Parmesan
For the topping:
3 cups (1-inch) diced ciabatta cubes
2 ounces thickly sliced pancetta, chopped
24 to 30 whole fresh basil leaves
3 tablespoons good olive oil, plus more for serving
Salt and pepper


Heat the oil in a large stockpot over medium heat. Add the onions, carrots, fennel, and garlic and cook over medium-low heat for 10 minutes, until tender. Add the ciabatta cubes and cook for 5 more minutes. Place the tomatoes in the bowl of a food processor fitted with the steel blade and process just until coarsely chopped. Add the tomatoes to the pot along with the chicken stock, red wine, basil, 1 tablespoon salt, and 1 1/2 teaspoons pepper. Bring the soup to a boil, lower the heat, and allow to simmer, partially covered, for 45 minutes.
Meanwhile, preheat the oven to 375 degrees F.

For the topping, place the ciabatta cubes, pancetta, and basil on a sheet pan large enough to hold them in a single layer. Drizzle with olive oil, sprinkle with salt and pepper, and toss well. Cook, stirring occasionally, for 20 to 25 minutes, until all the ingredients are crisp. The basil leaves will turn dark and crisp, which is perfectly fine. Reheat the soup, if necessary, beat with a wire whisk until the bread is broken up. Stir in the Parmesan and taste for seasoning. Serve hot sprinkled with the topping and drizzled with additional olive oil.

Photobucket

Salmon BLT Wraps
Photobucket
Grilled Salmon
Bacon slices
Sliced Tomato
Sliced Avocado
Lettuce leaves
Wrap
Stone Ground Dijon Mustard mixed with honey and lemon juice to taste

As you can see there's really not much of a recipe here, just a concept. Put as much or as little of each ingredient that you want to in your wrap. Spread your homemade honeymustard spread on your wrap, stack and enjoy. This is one of my favorite sandwiches.

Thursday, January 1, 2009

Brie En Croute with Dried Cherries and Pistachios

First of all, Happy New Year 2009!! It's going to be a great year for so many reasons. First of all - my husband and I will mark our first year of marriage! I can't wait till we get to celebrate in June. Secondly, my husband's sister is pregnant with her first child and due in July! I get to host the baby shower and we're all just so excited for this little bundle of joy to arrive. It'll be the first baby in our immediate family. And finally, my husband and I are planning a big trip to Hawaii for August that we're extremely excited about. We love to travel and have decided on Hawaii for our next destination. I can't wait to be there, exploring the islands and soaking in the sun - not to mention experiencing all the wonderful fresh cuisine! That will be a real treat.

And on that note, I leave you with this beautiful brie en croute.
Photobucket
I made this for an appetizer on Christmas Day and it was so good. It can be put together ahead of time, wrapped and refrigerated until you're ready to bake and serve it. I found the recipe online with a google search and the combo of dried cherries and salty pistachios with the creamy brie just sounded heavenly. Brie en croute is always a rich, silky treat and makes a very nice presentation for a special day. Enjoy!

Brie En Croute with Dried Cherries and Pistachios
Whole Foods website
Photobucket
17.5 ounces frozen puff pastry, thawed
1 (400-gram) wheel Brie
1/2 cup (+ few extra for garnish) dried cherries
1/4 cup cherry preserves
1 tablespoon brandy or cognac (optional)
1/2 cup (+ few extra for garnish) shelled pistachios, lightly toasted
1 egg, lightly beaten with 1 teaspoon water (optional)

Method
Preheat oven to 350°F.

Lay puff pastry flat on a non-stick or parchment-lined baking sheet or pie pan. Slice wheel of Brie in half horizontally to create two thinner Brie rounds. Place one Brie round (rind-side down) onto pastry dough. In a small bowl, mix together cherries, preserves and brandy. Spread evenly over Brie and scatter pistachios on top. Place other Brie round (rind-side up) over filling. Fold pastry edges up over Brie, and press together to seal. Flip entire package so that the seam is underneath. Brush top with egg wash if desired.

Bake 15 to 20 minutes, until pastry is golden brown. Let cool 5 minutes before serving. Garnish sparingly with additional toasted pistachios and dried cherries.
Photobucket