Friday, February 27, 2009

Another Avatar Design

I designed this avatar for Amy over at From the French Kitchen for her special feature posts called Tour De Food Blogs. As part of her tour, she features a new blog every month. The post usually includes recipes, a story about the blog owner and other fun facts about their cooking style. It's a great service to get the word out about all the great blogs out there! So congrats to Amy for coming up with such a unique and fun idea and I'm so glad I could help her out to launch this little blog project. Here's a pic of the avatar:

Photobucket

Monday, February 23, 2009

Week 1 Down, 5 more to go!

Week 1 of my Fitness Challenge is done. I survived! Actually, it wasn't too tough. I definitely did dread Wednesday, but I kept thinking, if I dread it now, I'm really going to dread it come Week 3!
I found that most days I felt better when I worked out in the morning versus in the afternoon after work. But getting up can be SO INCREDIBLY HARD some mornings. Especially when my husband - who is still recovering from ankle surgery - can lay in bed all day and doesn't have to get up. That kills my motivation to rise early even more.
Oh well - I'm on to Week 2! Of course, I didn't get up early this morning so I'll be starting tonight when I get home from work. But I vow to do the next two workouts in the morning because I won't have time in the next two evenings and I can't miss a day.
Pressing on...

Saturday, February 21, 2009

Moqueca De Peixe

In other words, Fish Stew. Brazilian fish stew to be exact.
Photobucket
I made this dish for our Valentine's Day dinner. Why did I choose this? The answer is simple. We went to Brazil for our honeymoon and had this exact fish stew in Trancoso. So it was an attempt to bring back those sun-filled breezes and days of leisure from our fabulous honeymoon. It worked! This stew was so delicious. I searched online for recipes and found this one at The Food Network . It sounded like it had all the elements we remembered from the Bahian fish stew we enjoyed in Trancoso and it was a great match. The one we had in Brazil had a thicker broth, but I kind of enjoyed that this one was a bit lighter and soupier. More like a stoup - as Rachael Ray always says. What really makes this dish though is the coconut milk. It just screams tropical and brings out the sea in seafood. If that makes any sense. This was easy to put together and so fun to eat. I served it with steamed Basmati rice and ice cold Caipirinhas , which was featured in one of my first blog entries.
This dish was so good and photographed so nicely, that I'm submitting this to Joelen's Brazilian Carnivale food contest at Joelen's Culinary Adventures. I hope you get a chance to go to Brazil, but if not, let this colorful, flavorful stew bring a piece of Brazil to you. Enjoy!

Moqueca De Peixe
source: The Food Network
Photobucket
2 tablespoons olive oil
1 medium onion, cut into 1/4inch dice
1 red bell pepper, cored, seeded, and cut into 1/4inch dice
1 green bell pepper, cored, seeded, and cut into 1/4inch dice
1 yellow bell pepper, cored, seeded, and cut into 1/4inch dice
2 plum tomatoes, seeded and cut into 1/4inch dice
1 teaspoon salt
1/2 teaspoon freshly ground black pepper
1 1/2 serrano chiles, stemmed, seeded, and minced
3 cups fish stock or bottled clam juice
1 can (14 1/2 ounce) canned coconut milk
6 green onions, white and light green parts only, finely sliced
1 pound sea scallops
1 pound monkfish fillets, cut into 1inch cubes I substituted mussels for the fish fillets and am SO glad I did. They were excellent in the stew.
1 pound rock shrimp, shelled and deveined
Juice of 1 lime
2 tablespoons dende oil (see Note) I just used olive oil because I couldn't find this. Also I think it was the culprit for some...ahem...constipation...I enjoyed while in Brazil. So you might want to leave it out if you're not used to this oil It can be kind of hard on the system. Ok sorry if that was TMI!)
1/3 cup loosely packed cilantro leaves, coarsely chopped
1/3 cup unsweetened coconut shards, lightly toasted, for garnish
2 limes, flesh cut into supremes and diced
Fried plantains, for serving (optional)
Cooked white rice, for serving (optional)
Directions
Heat a large castiron and enamel or other heavy casserole over low heat and add the olive oil. Sweat the onion and peppers together for about 5 minutes, or until nicely softened. Add the tomatoes, salt, pepper, and chiles and cook for 2 minutes more. Add the fish stock and coconut milk and bring the mixture to a simmer.
Photobucket
Cook for about 10 minutes, stirring occasionally, until the peppers are tender. Add the green onions and all the fish, cover, and cook for 5 to 7 minutes more, stirring together gently twice during the cooking time. Add the lime juice, dende oil, and cilantro and simmer for 5 minutes more. Serve in large heated bowls, sprinkled with the toasted coconut and diced limes. Offer fried plantains and white rice on the side, if desired.
Photobucket
Note: Dende oil is Brazilian palm oil, available in Latin American markets. Be sure to get the Brazilian rather than the West African product, which is much heavier. Or use half the amount of the West African palm oil and substitute vegetable oil for the other half.

Friday, February 20, 2009

Homemade Guacamole

Not to boast, but my homemade guacamole is kind of a big deal (anyone seen Anchorman? haha).
Photobucket
But seriously, it is. I have had so many requests from friends and family for my guacamole at parties and gatherings. Once, my mom and I polished off a whole bowl ourselves. This recipe didn't happen overnight though. I must have tried tons of different recipes and combination of recipes before getting exactly how I wanted it. And honestly, it changes almost every time I make it. I never measure, I just go by taste. Meaning, I add some spice, taste, add more if needed etc. But I have kind of got it down to a science. I'm definitely not a guacamole purist - meaning I add nearly everything but the kitchen sink to my guacamole. Some people just do avocado, lime and salt. I need more than that! Give me spicy, garlicky and chunky. I served it up recently with a ground turkey and black bean quesadilla that I seasoned with cumin, chili powder and pepperjack cheese.
Photobucket
Do yourself a favor. Buy a bag of good blue corn chips, make yourself a salty tangy margarita and settle in with this bowl of guacamole. You'll never be the same again!

Lisa's Homemade Guacamole
Photobucket
4 ripe avocados
juice of 1 lime
sea salt to taste (I don't use too much salt if I'm eating it with salty chips, but salt is essential to bring out the taste of the avocado)
2 jalapenos, seeded and diced
1/2 tablespoon garlic, minced (I use the jarred kind here because I find it a little milder than raw bulb garlic, which can upset my stomach)
1 tomato (or 2 if you want, sometimes I use two), diced
1/2 teaspoon chili powder
1/2 teaspoon cumin
1/2 teaspoon of red pepper flakes
a few healthy dashes of tabasco sauce (if you don't like the flavor of this just leave it out)
a swirl of olive oil (I don't measure, I just take the jar and pour in a swig, I find this adds to the creaminess and richness)
a handful of chopped cilantro


Cut your avocados in half. To remove the pit you can use a spoon or if you're brave you can hold the avocado in your hand and come down on the pit with the blade of the knife. The pit will stick onto the knife blade and you can pull it out pretty easily. Then peel your avocados and place them in a bowl.
I then use a pastry cutter to smash my avocados. I find it's easier than using a fork and I get a good consistency this way.
Photobucket
Next I juice one lime in a bowl and then sprinkle in about 1 teaspoon of salt - I don't measure just eyeball. The acid from the lime helps break down and melt the salt so it gets evenly distributed through the guacamole. Once the salt is nearly dissolved in the lime juice, I pour it over the mashed avocado and mix it in. If you think all that juice will be too much you can just use half, taste and see how you like it. Then at the end you can always add more.
Photobucket
Next I add in the chopped jalapeno, spices, garlic, tomato, tabasco sauce, olive oil and cilantro and mix gently with a spoon.
You can then decorate with a cilantro leaf and serve in a festive bowl alongside a huge basket of chips. Enjoy!

Tuesday, February 17, 2009

Working on my fitness...

So I kind of fell off the wagon when it comes to working out. See, before my wedding I was up to running 5 miles about four to five times a week and watching what I ate. I had motivation though - a dress to fit into. Since last June though, it's been falling apart. I carried it through the summer pretty well, but allowed myself to eat a little more loosely (ice cream here, a cookie there etc.) Then winter came. I hate running outside in the cold so I was relegated to my treadmill. I just can't run as long on the treadmill - I get bored. Even with a tv. Then I got sick. Four times!! I've had four colds - or the same one four times, I can't tell - this season. That really hasn't helped me stay on a workout schedule.
So I bought the 30-day shred DVD a while ago and have been haphazardly doing it on and off for about a month now. This week though I decided to start my new "Get In Shape For Cabo" plan. We booked a trip to Cabo San Lucas for May so now, like my wedding, I have a goal to shoot for - a brand new bikini for Mexico. Or bust. And bust I will...literally.
Here's my plan: the 30-Day shred DVD has three workouts that increase in intensity and difficulty known as Level 1, Level 2 and Level 3 (That Jillian Michaels is a marketing genius!). Anyway, over the next 6 weeks I will complete each level along with running intervals. Why am I doing it this way? Well I don't know. It just sounds good. And week 5 and 6 sound like they will really kick my ass. But I will get it done. I feel like putting it on my blog will hold me to it. I'll update twice-weekly on my progress as well. And I even took my measurements yesterday (meaning bust, waist and hips) to see how many inches I "shred". Drumroll please....here's the schedule:

Week 1 and 2:
Monday - Level 1 of 30-Day Shred, Run 1 mile
Tuesday - Level 1 of 30-Day Shred, Run 2 miles
Wednesday - Level 1 of 30-Day Shred, Run 3 miles
Thursday - Level 1 of 30-Day Shred, Run 2 miles
Friday - Level 1 of 30-Day Shred, Run 1 mile

Week 3 and 4:
Monday - Level 2 of 30-Day Shred, Run 2 miles
Tuesday - Level 2 of 30-Day Shred, Run 3 miles
Wednesday - Level 2 of 30-Day Shred, Run 4 miles
Thursday - Level 2 of 30-Day Shred, Run 3 miles
Friday - Level 2 of 30-Day Shred, Run 2 miles

Week 5 and 6 (otherwise known as Hell Week!):
Monday - Level 3 of 30-Day Shred, Run 3 miles
Tuesday - Level 3 of 30-Day Shred, Run 4 miles
Wednesday - Level 3 of 30-Day Shred, Run 5 miles
Thursday - Level 3 of 30-Day Shred, Run 4 miles
Friday - Level 3 of 30-Day Shred, Run 3 miles

Notice how Wednesday is the capstone of the workouts? I will literally be getting over a hump on humpday. So this morning I completed Day 2 of Week 1. Only 3 days and 5 weeks to go. Holy Cabo Wabo Batman! Wish me luck...

Monday, February 16, 2009

Barefoot Bloggers: Real Spaghetti and Meatballs

Who doesn't love a big plate of comforting spaghetti and meatballs? Ina's version was a real winner too. I did make a few additions to her recipe and some other changes. I added one bag of cooked spinach to my meatball mixture to try to mix in some greens with this meal. I also swapped out regular pasta for whole wheat pasta in a further attempt to make spaghetti and meatballs somewhat good for you. My husband wasn't too happy about that, but he still ate two plates. So obviously it wasn't that awful! My other additions are italicized below.
Photobucket
I noticed a lot of people said they didn't have enough sauce for all their meatballs. I halved the meatball recipe and just used a pound of ground beef I had in the freezer, but I kept the sauce measurements the same, so I found I had plenty of sauce for my meatballs. I also added some extra liquid to my sauce as well - in addition to the wine and tomatoes I added about a 1/2 cup to 3/4 cup of beef stock. Both because I had some open in the fridge that needed to be used and because I figured it would only add to the flavor. It served both purposes well. I can see though otherwise how you'd run short on sauce. This recipe, as most of her recipes, makes a lot of meatballs. Way more than the serving size suggests. It's a great basic recipe though and mine turned out very tasty.

Real Spaghetti and Meatballs
source: Ina Garten, www.thefoodnetwork.com
Photobucket
1/2 pound ground veal
1/2 pound ground pork
1 pound ground beef
1 10oz box of frozen chopped spinach or 1 bag of baby spinach, cooked
1 cup fresh white bread crumbs (4 slices, crusts removed)
1/4 cup seasoned dry bread crumbs
2 tablespoons chopped fresh flat-leaf parsley
1/2 cup freshly grated Parmesan cheese
2 teaspoons kosher salt
1/2 teaspoon freshly ground black pepper
1/4 teaspoon ground nutmeg
1 extra-large egg, beaten
Vegetable oil
Olive oil
For the sauce:
1 tablespoon good olive oil
1 cup chopped yellow onion (1 onion)
1 1/2 teaspoons minced garlic
1/2 tablespoon of anchovy paste
1 tablespoon of tomato paste
1/2 cup good red wine, such as Chianti
1/2 to 3/4 cup of beef stock
1 (28-ounce) can crushed tomatoes, or plum tomatoes in puree, chopped
1 tablespoon chopped fresh flat-leaf parsley (i used more like 4)
4 tablespoons (or a good handful) of chopped fresh basil
1 1/2 teaspoons kosher salt
1/2 teaspoon freshly ground black pepper
For serving:
1 1/2 pounds spaghetti, cooked according to package directions
Freshly grated Parmesan
Directions
Place the ground meats, both bread crumbs, parsley, Parmesan, salt, pepper, nutmeg, egg, and 3/4 cup warm water in a bowl. Combine very lightly with a fork. Using your hands, lightly form the mixture into 2-inch meatballs. You will have 14 to 16 meatballs.

Pour equal amounts of vegetable oil and olive oil into a large (12-inch) skillet to a depth of 1/4-inch. Heat the oil. Very carefully, in batches, place the meatballs in the oil and brown them well on all sides over medium-low heat, turning carefully with a spatula or a fork. This should take about 10 minutes for each batch. Don't crowd the meatballs. Remove the meatballs to a plate covered with paper towels. Discard the oil but don't clean the pan.
Photobucket
For the sauce, heat the olive oil in the same pan. Add the onion and saute over medium heat until translucent, 5 to 10 minutes. Add the garlic and cook for 1 more minute. Add the wine and cook on high heat, scraping up all the brown bits in the pan, until almost all the liquid evaporates, about 3 minutes. Stir in the tomatoes, parsley, salt, and pepper.

Return the meatballs to the sauce, cover, and simmer on the lowest heat for 25 to 30 minutes, until the meatballs are cooked through. Serve hot on cooked spaghetti and pass the grated Parmesan.
Photobucket

Friday, February 13, 2009

PW's Ranch Style Chicken and Potatoes

When I saw this recipe on The Pioneer Woman's blog I was in love.
Photobucket
Cheese, bacon, chicken with a honey mustard marinade?? Why didn't I think of that?
Photobucket
In fact, I have that reaction to a lot of her recipes. They are so simple and yet so good. I often wonder why I didn't put that combination together. This chicken was no exception. It comes out moist, flavorful and satisfying. My husband was very happy with it since it included bacon - one of his favorite things.
I served it with a version of her fluffy new potatoes. Except, since I had some homemade guacamole leftover (that I'll hopefully update the blog with soon), I used that instead of her combo of cream cheese and sour cream etc. to flavor my spuds.
Photobucket
This was an easy and versatile way to prepare potatoes that, of course, I had never thought of before.
Truly, I'm so jealous of her lifestyle. She lives on this big beautiful ranch, takes fabulous photos of all the animals, expansive scenery, her five kids, her ranch-hand husband roping cattle and probably makes a pretty good chunk of change with her "food blog" -I say it in quotes because it's really so much more than that. Again - why didn't I think of that? Although, my photography skills are so-so, I live in a townhouse in suburban Maryland with 4 cats, my husband is a mechanic (he does hurt himself a lot so I guess I could write and photograph about that? Nah) and I haven't developed a whole plethora of recipes on my own.
Oh well. Perhaps one day I can actually improve this blog thing and take it to new heights. But for now, it is what it is. Sigh.

Wednesday, February 11, 2009

Giada's Chicken Piccata

I think this has been making the rounds on the blogosphere lately. For me though, this meal has sentimental value.
Photobucket
Why? Well, I used to make this all the time when my husband and I first moved in together - before we were married. We got a two-bedroom apartment together six months after we met. It was a gamble moving in together that quickly but somehow we just knew it would work. And it did! Sometimes I'm still so amazed that my husband and I found each other. It was completely by chance, but I can't imagine us being more suited for each other. We met randomly at a bar one night - he was there with his friends, I was there with mine. I noticed him immediately when he came in, but if you've seen my husband that isn't hard to do.

He's average height, 6'0, but what was really distinctive about him when we met was his hair. It was long. And I mean really long. Like halfway down his back long. On top of that, he's half-Brazilian. So he was literally tall, dark and handsome with long, black hair (he's since cut it). At first glance, I thought he was Native American. And when he walked into the bar that night looking all exotic with this long, black hair he truly looked like something off the cover of one of those Fabio-style romance novels. Except without the schmultz. I mean, he was dressed in baggy jeans, a button down cotton shirt with the sleeves rolled up and a fleece vest. But I could easily picture him on the back of a horse in the old west in a pair of deerskin chaps with the fringe on the side, no shirt, muscles rippling, and a feather headdress in his hair - this was me still thinking he was Native American.

Anyway, we finally got to talking that night after one of his friends convinced him to go for it (apparently he had noticed me too) and I discovered he was not Native American, but Brazilian. So still very mysterious to me. But at the same time, talking to him felt like being with an old friend - we just clicked. He asked for my number, called me two days later confessing that he couldn't wait the proverbial "four-day period" because he was so excited to talk to me again and the rest is history.

We moved in together and I began to cook. I ventured outside of my comfort zone rarely when I first starting cooking, so I had a lot of meals I rotated every week. Among them was pesto pasta, lasagna, spaghetti with homemade meat sauce, baked chicken, hamburgers on the George Foreman, quiche and Giada's chicken piccata. These dishes were all sure-fire meals to please my husband, who was at the time my live-in boyfriend. And they still work today.

A classic never dies, and this chicken piccata is definitely one for the books. I did add some chopped artichoke hearts to change it up a bit this time around. And since we're a little more wary of our weight these days (getting older sucks), I served it on a bed of wilted spinach, instead of a mound of pasta. Enjoy!

Chicken Piccata
source: The Food Network
Photobucket
2 skinless and boneless chicken breasts, butterflied and then cut in half
Sea salt and freshly ground black pepper
All-purpose flour, for dredging
6 tablespoons unsalted butter
5 tablespoons extra-virgin olive oil
1/3 cup fresh lemon juice
1/2 cup chicken stock
1/4 cup brined capers, rinsed
1/3 cup fresh parsley, chopped
Directions
Season chicken with salt and pepper. Dredge chicken in flour and shake off excess.

In a large skillet over medium high heat, melt 2 tablespoons of butter with 3 tablespoons olive oil. When butter and oil start to sizzle, add 2 pieces of chicken and cook for 3 minutes. When chicken is browned, flip and cook other side for 3 minutes. Remove and transfer to plate. Melt 2 more tablespoons butter and add another 2 tablespoons olive oil. When butter and oil start to sizzle, add the other 2 pieces of chicken and brown both sides in same manner. Remove pan from heat and add chicken to the plate.

Into the pan add the lemon juice, stock and capers. Return to stove and bring to boil, scraping up brown bits from the pan for extra flavor. Check for seasoning. Return all the chicken to the pan and simmer for 5 minutes. Remove chicken to platter. Add remaining 2 tablespoons butter to sauce and whisk vigorously. Pour sauce over chicken and garnish with parsley.

Photobucket

Tuesday, February 10, 2009

Seafood Lasagna Rolls with Vodka Sauce

There is only one word needed to describe this dish....supercalifragilisticexpialedocious! It was out of this world good. I combined two recipes found online, the first was Melissa of Delicious Meliscious Seafood Lasagna Rolls and the second was The Pioneer Woman's Vodka Sauce .

I served this as a main dish at my dinner party, along with Lemon-Spiced Chicken from my Newlywed's Cookbook (which was also delicious, moist and spicy). The entire casserole dish of lasagna was gone! My brother had two rolls himself, which was quite a lot. Everyone loved it! So if you need a surefire hit for a dinner party, this is definitely it.

Here's the basic recipe from Melissa's blog (I doubled this for 20 people) with my substitutions in bold. Unfortunately I don't have a picture of the finished product because I got so busy that night I forgot! But check out Melissa's post for a great final product photo:

Seafood Lasagna Rolls
6 lasagna noodles
1 ½ tbsp. olive oil
1 lb. shrimp, peeled and deveined (I used frozen easy-peel shrimp)
salt and pepper
2 cloves garlic, minced
1 small can lump crab meat (I recommend Trader Joe's canned crab meat if you can get it)
15 oz. ricotta cheese
1 cup shredded mozzarella cheese
1/2 cup Parmesan cheese grated
1 egg, lightly beaten
2-3 tbsp. chopped fresh basil
pinch of nutmeg
1 ¾ cups marinara sauce, divided I used PW's vodka sauce here
shredded mozzarella cheese, for topping

Directions:
Preheat the oven to 350°.

Bring a large pot of water to boil over high heat. Add the lasagna noodles and cook until partially tender, about 8 minutes. Drain and set aside.

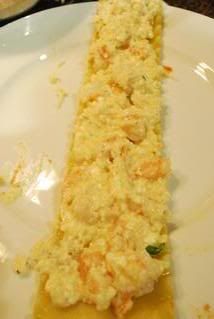
Meanwhile, heat the oil in a large skillet over medium heat. Add the shrimp to the skillet; season with salt and pepper. Add the garlic to the pan as well and sauté until shrimp are cooked, about 4 minutes, stirring often. Remove from heat and let cool. Coarsely chop the cooled shrimp and place in a bowl with 1 cup of ricotta cheese, the Parmesan, crab, egg, basil, salt and pepper to taste, and the nutmeg. Stir to combine.

In another bowl, combine 1 ½ cups of marinara sauce with remaining ricotta, to taste. Stir until smooth.

In an 8×8” baking dish, spread the remaining ¼ cup of marinara sauce so it covers the bottom. Lay lasagna noodles out on a work surface. Divide the shrimp mixture evenly between the noodles and spread over the full length of each.
Photobucket

Roll up and place seam-side down in the baking dish. Spoon the creamy marinara sauce over the top. Top with shredded mozzarella.

Bake until lasagna rolls are heated through and cheese begins to brown, about 25 minutes.

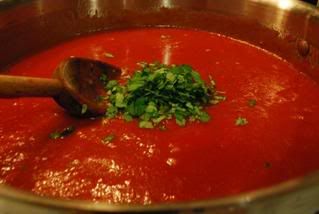
PW's Vodka Sauce
1 medium onion, chopped finely (I only used 1/2 onion)
2 to 3 cloves of garlic, chopped
2 tablespoons olive oil
2 tablespoons butter
3/4 to 1 cup vodka
1 can tomato puree
1 cup heavy cream
Pinch of red pepper flakes
1/4 to 1/2 teaspoon salt
Freshly ground black pepper
1 cup grate Parmesan cheese (I didn't do this since there was tons of cheese in the lasagna)
I also added a bunch of fresh chopped basil

Cook pasta according to package directions, being careful not to overcook.
In a large skillet over medium heat, add olive oil and butter.
Photobucket
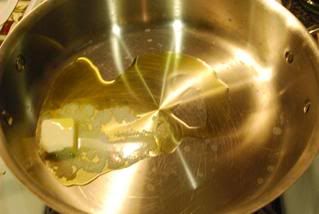
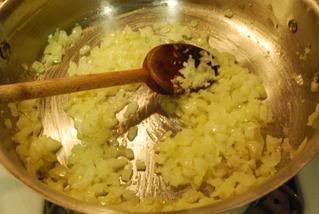
When butter is melted, add in chopped onions and garlic. Stir and allow to cook for two minutes.
Photobucket
Pour in vodka. Stir and cook for three minutes.
Photobucket
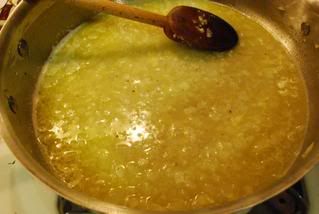
Add in tomato puree and stir.
Photobucket
Allow to simmer, being careful not to overheat.
Stir in red pepper flakes, salt, pepper, 
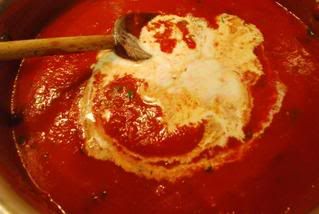
basil if using and Parmesan cheese.
Photobucket
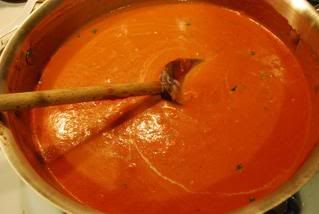
Reduce heat to low and stir in cream.
Photobucket
Drain the pasta, reserving 1 cup of pasta water in case sauce is too thick.
Add cooked pasta to the sauce, tossing to combine. Splash in a little water if it needs it,
Stir in Parmesan cheese.
Pour mixture into large serving bowl.
Photobucket

I used leftovers of this sauce to make a pizza during the week and it was even more delicious. This is such an easy, go-to sauce recipe that super tasty!

Monday, February 9, 2009

Sundays with Sawyer

And just for fun, here is my goofy cat climbing into my photo lightbox. I think he's ready for his close-up!
Photobucket

Savory Spinach Palmiers and Bacon-Wrapped Dates

These were two of the star appetizers for my dinner party. Here's a snapshot of the table in progress:
Photobucket.
Once the party started though I didn't have time to take any photos unfortunately so I never got one of the full table or the main dishes. Oh well. Anyway...
I got the inspiration for the spinach palmiers from Michele over at My Italian Grandmother , as well as the well-known Barefoot Contessa Ina Garten. I made some substitutions, but overall this recipe is fairly simple - egg, spinach, cheese, puff pastry, mix, roll and bake. You end up with a very impressive little snack! Enjoy!

Savory Spinach Palmiers
Photobucket
1 box of puff pastry (two sheets), defrosted
1 egg and 1 tbsp of water, beaten
1 cup cup shredded mozzarella
1 cup ricotta cheese
1/4 cup grated romano cheese
1/2 onion, diced
1 clove garlic, minced or grated
1 tbsp extra virgin olive oil
salt and pepper, to taste
1 10 oz box of frozen spinach, defrosted and drained well
pinch of nutmeg
Directions:

1. Saute onion and garlic in oil until onions are tender and translucent. Remove. Let cool.

2. In a mixing bowl, mix the cheeses and spinach, taste and season with salt and pepper and nutmeg. Add in your cooled onion and garlic mixture.

3. Lay out one sheet of puff pastry on a flat surface that has been dusted with flour.

4. Spread half of the mixture onto the dough.
Photobucket
5. From the short ends, fold each side of the puff pastry in halfway to the middle, and then fold it in halfway again so that the folds are touching in the middle. At this point you can wrap and refrigerate the pastry for 45 minutes or overnight.

6. When ready to serve, remove the pastry from the fridge and slice in 1/2 inch thick slices. Lay them out on a non-stick, or greased, cookie sheet.

7. Bake at 400 for about 15 minutes or until golden. I found that I had to flip these once halfway through the baking to make sure they cooked evenly on both sides.

8. Remove and serve warm.

Bacon-Wrapped Dates with Gorgonzola Cheese
Photobucket
These were very simple. I've seen them done before so didn't really follow a recipe, just kind of mimicked the method.

1 package of medjool dates (pitted or unpitted)
1 package of bacon
1 package of gorgonzola cheese

If you bought pitted dates, it's very easy to pit these. Simply slice a slit down the belly of the date to make it a pouch, then squeeze the date open by pushing on both ends and reach in and pull out the pit.
Then you can cube your gorgonzola cheese to about 1/2 in thick cubes and shove them into the pouch of the date.
I also like to cook my bacon slightly before wrapping the dates so that I can ensure it crisps up completely in the oven. I bake it for about 5 to 10 minutes in the oven on 400 degrees first, let it cool and then wrap it around my dates.
Then I place the bacon-wrapped dates stuffed with the gorgonzola cheese back in the oven at 400 degrees for about 10 to 15 minutes. You don't want the dates or bacon to burn so just keep your eye on them. Remove and serve.

I can't tell you how many people balked when they first saw these little wrinkled numbers sitting on the table. But one taste and they were hooked! The salty, sweet, pungent combo of cheese, bacon and dates is out of this world. Try it!

Friday, February 6, 2009

Mini-Orange Chocolate Cakes

These were my pick for a Barefoot Bloggers bonus recipe a few months ago, but I never got around to making them. So, I figured they would be the perfect individual desserts for my dinner party last weekend. These were quite simple to make and result in a very pretty presentation. I used my mini-bundt pan from Williams-Sonoma to make these cakes.
Photobucket
I also wasn't going to do the ganache topping at first, because I thought it would be too messy, too complicated and too sweet. I'm glad I went against my instincts and made the ganache because it made all the difference - especially in aesthetics.

Mini-Orange Chocolate Cakes
source: Ina Garten, Barefoot Contessa
Photobucket
Ingredients
1/4 pound unsalted butter at room temperature
1 cup sugar
2 extra-large eggs at room temperature
1/8 cup grated orange zest (2 large oranges)
1 1/2 cups all-purpose flour plus 1 tablespoon
1/4 teaspoon baking powder
1/4 teaspoon baking soda
1/4 teaspoon kosher salt
1/4 cup freshly squeezed orange juice
3 ounces buttermilk at room temperature
1 teaspoon pure vanilla extract
1 cup good semisweet chocolate chunks
For the syrup:
1/4 cup sugar
1/4 cup freshly squeezed orange juice
For the ganache:
4 ounces good semisweet chocolate chips
1/4 cup heavy cream
1/2 teaspoon instant coffee granules
Directions
Preheat the oven to 350 degrees F. Grease and flour 6 individual serving baking molds, such as the flexible non stick 100 percent silicone molds.

Cream the butter and sugar in the bowl of an electric mixer fitted with the paddle attachment for about 5 minutes, or until light and fluffy. Add the eggs, 1 at a time, then the orange zest.

Sift together 1 1/2 cups flour, the baking powder, baking soda, and salt in a large bowl. In another bowl, combine the orange juice, buttermilk, and vanilla. Add the flour and buttermilk mixtures alternately in thirds to the creamed butter, beginning and ending with the flour. Toss the chocolate chunks with 1 tablespoon flour and add to the batter. Pour into the pans, smooth the tops, and bake for 30 minutes, until a cake tester comes out clean. Let the cakes cool in the molds on a wire rack for 10 minutes.

Meanwhile, make the syrup. In a small saucepan over medium-low heat, cook the sugar with the orange juice until the sugar dissolves. Remove the cake from the pans, put them on a rack over a tray, and spoon the orange syrup over the cakes. Allow the cakes to cool completely.

For the ganache, melt the chocolate, heavy cream, and coffee in the top of a double boiler over simmering water until smooth and warm, stirring occasionally. Drizzle over the top of the cakes.

Photobucket